Loop
"Often you want to iterate over a series of pins and do something to each one. For instance, this example blinks 6 LEDsattached to the Arduino or Genuino by using a for() loop to cycle back and forth through digital pins 2-7. The LEDS are turned on and off, in sequence, by using both the digitalWrite() and delay() functions ."
Tutorial
In my opinion, it's almost like the LED sequence that we attempted earlier-- except this time, our experiment was successful. It might be because the schematic is more accurate than the previous ones. I didn't struggle in this experiment. Perhaps it's because I was more careful and observant than before. I was the last to start the set up, and was the second to successfully complete the experiment.
Materials:
1. Arduino board
2. Breadboard
3. 220 ohm resistors
4. 6 LEDs
5. jumper wires
 |  |
Loop Code:
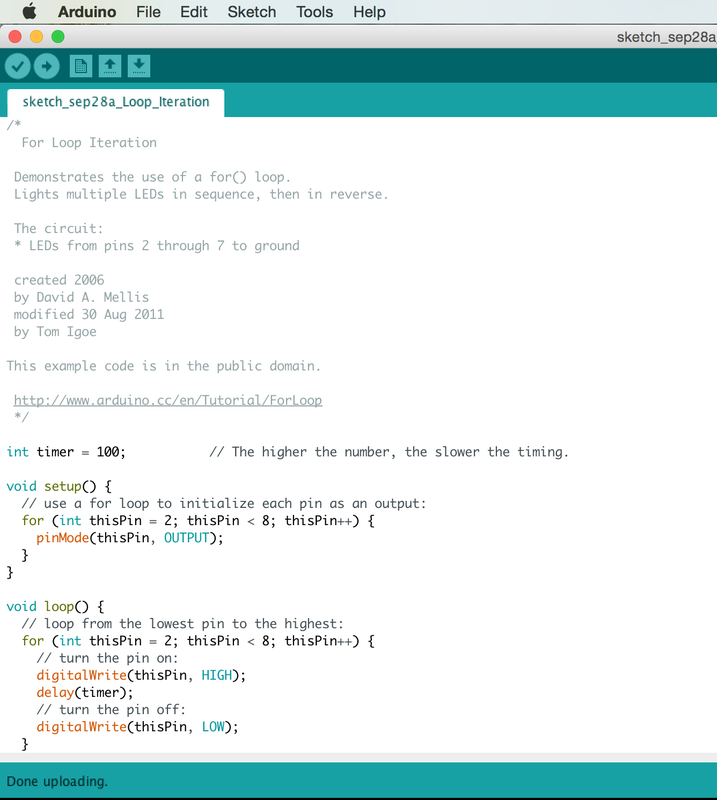
/*
For Loop Iteration
Demonstrates the use of a for() loop.
Lights multiple LEDs in sequence, then in reverse.
The circuit:
* LEDs from pins 2 through 7 to ground
created 2006
by David A. Mellis
modified 30 Aug 2011
by Tom Igoe
This example code is in the public domain.
http://www.arduino.cc/en/Tutorial/ForLoop
*/
int timer = 100; // The higher the number, the slower the timing.
void setup() {
// use a for loop to initialize each pin as an output:
for (int thisPin = 2; thisPin < 8; thisPin++) {
pinMode(thisPin, OUTPUT);
}
}
void loop() {
// loop from the lowest pin to the highest:
for (int thisPin = 2; thisPin < 8; thisPin++) {
// turn the pin on:
digitalWrite(thisPin, HIGH);
delay(timer);
// turn the pin off:
digitalWrite(thisPin, LOW);
}
// loop from the highest pin to the lowest:
for (int thisPin = 7; thisPin >= 2; thisPin--) {
// turn the pin on:
digitalWrite(thisPin, HIGH);
delay(timer);
// turn the pin off:
digitalWrite(thisPin, LOW);
}
}
In this video above, I used the code from the tutorial. In the video below, I adjusted the speed timer = 20. The higher the number, the slower the timing.
Array
Array is similar to loop, except that it doesn't go in linear, straight forward sequence. Here is my analogy: If loop goes 12345, array puts it in a different pattern like this 15324.
The set up is the same as the loop, therefore if you're already working on the loop, you can just copy and paste the array code: Tutorial
The set up is the same as the loop, therefore if you're already working on the loop, you can just copy and paste the array code: Tutorial

This could be used to plan a LED sequence for the halloween props project! I kept this experiment for tomorrow's (Thursday) Tech Club meeting-- so that I can show this cool stuff to the rest of my club members. :D
Array Code:
/*
Arrays
Demonstrates the use of an array to hold pin numbers
in order to iterate over the pins in a sequence.
Lights multiple LEDs in sequence, then in reverse.
Unlike the For Loop tutorial, where the pins have to be
contiguous, here the pins can be in any random order.
The circuit:
* LEDs from pins 2 through 7 to ground
created 2006
by David A. Mellis
modified 30 Aug 2011
by Tom Igoe
This example code is in the public domain.
http://www.arduino.cc/en/Tutorial/Array
*/
int timer = 100; // The higher the number, the slower the timing.
int ledPins[] = {
2, 7, 4, 6, 5, 3
}; // an array of pin numbers to which LEDs are attached
int pinCount = 6; // the number of pins (i.e. the length of the array)
void setup() {
// the array elements are numbered from 0 to (pinCount - 1).
// use a for loop to initialize each pin as an output:
for (int thisPin = 0; thisPin < pinCount; thisPin++) {
pinMode(ledPins[thisPin], OUTPUT);
}
}
void loop() {
// loop from the lowest pin to the highest:
for (int thisPin = 0; thisPin < pinCount; thisPin++) {
// turn the pin on:
digitalWrite(ledPins[thisPin], HIGH);
delay(timer);
// turn the pin off:
digitalWrite(ledPins[thisPin], LOW);
}
// loop from the highest pin to the lowest:
for (int thisPin = pinCount - 1; thisPin >= 0; thisPin--) {
// turn the pin on:
digitalWrite(ledPins[thisPin], HIGH);
delay(timer);
// turn the pin off:
digitalWrite(ledPins[thisPin], LOW);
}
}
 RSS Feed
